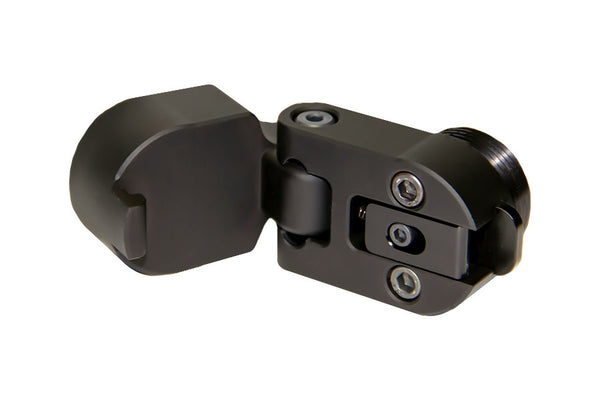
XLR Push Button Folding Adapter
$ 170.00
The XLR Push Button Folding Stock Adapter attaches between the action block and buttstock, allowing the stock to be folded into a more compact package for easier storing and cleaning.
The folder will extend LOP measurements by 1.375".
For the TR-2 buttstock, Shorter buffer tubes are available that will compensate for the added length of the adapter keeping the LOP in the 12” to 15” range.
For the Carbon buttstock, we HIGHLY recommend ordering the short carbon buttstock (12 1/2") if you want the buttstock folding. When the short buttstock is used with the folding adapter, the LOP will be between 13.5-13.75" depending on action and trigger used.
*WEIGHT: 4.9 ounces.
**NOTE: Will require modification if used on Howa-specific chassis
How to Install an XLR Push Button Folding Adapter on Your Rifle
Upgrading your rifle with an XLR Push Button Folding Adapter can turn it into a more compact package, making it easier for transportation and storage. Not only does this folding adapter allow for buttstock folding, but it also helps to extend LOP (length of pull) measurements if desired. In this article, we will guide you step by step on how to install an XLR Push Button Folding Adapter on your rifle, brought to you by XLR Industries.
What You Will Need:
- XLR Push Button Folding Adapter
- Compatible Rifle chassis or stock
- Tools for installation (Allen wrenches)
- Compatible AR Style Buttstock
Step 1: Select the Right Adapter
Ensure that your XLR Push Button Folding Adapter is compatible with your rifle. Some rifles, such as those with an XLR Howa 1500 chassis, may require modification which XLR can do prior to the folding adapter shipping. It's also essential to check whether the adapter will require any changes to your buttstock configuration to maintain the correct LOP.
Step 2: Remove the Existing Buttstock
- Start by removing the AR grip and the small set screw on the bottom of the chassis system.
- Remove the buttstock from the chassis block. If the buttstock has a castle nut break the nut loose and unthread the buttstock assemble or buffer tube. If you have an XLR Contoured buffer tube break the buffer tube loose by using a ¼” allen in the cut provision on the back of the buffer tube.
Keep the screws and other components in a safe place, as you might need them later.
Step 3: Attach the XLR Folding Adapter
- Open the folding adapter by depressing the latch. Once open loosen the two socket head bolts to create a ¼” gap between the threaded plug and the folder body.
- Thread the folding adapter in until the plug is recessed ¼” into the chassis block. Now Index the folding adapter so it swings OPPOSITE of your bolt handle.
- Once indexed, tighten the two large socket head bolts in the folder, tightening the folding adapter against the chassis block; these can be torqued to 35 INCH pounds.
Step 4: Attach the Buttstock
- On the bottom of the folding adapter, where the buffer tube threads in, there is another small set screw. Remove this prior to attaching the buffer tube.
- Thread the buffer tube/buttstock and assemble it into the folding adapter until bottomed out. Back it out slightly until indexed appropriately with the rifle and, if available align the machined groove in the buffer tube threads with the set screw hole.
- We recommend using the short 12.5” LOP carbon buttstock with the folding adapter, which then puts the LOP to 13.75”
- We recommend using the Short Buffer Tube with the folding adapter keeping the LOP range at 12-15.
- The short LOP Adapter can be purchased and changed out for the C-6 buttstock allowing a 13.5-14.5 LOP range.
- Torque the castle nut to 35 FOOT pounds.
- Insert the set screw in the bottom of the folding adapter and bottom out to hand tight.
- NOTE: You do not need to re-install the set screw into the chassis block
Step 6: Test the Push Button Folding Adapter
Once everything is installed, test the push button folding adapter by pressing the button and folding the stock. Make sure it folds smoothly and locks into place securely.
Step 7: Final Inspection
Do a final inspection to make sure everything is secure and functioning correctly. Also, check that the adapter and buttstock do not interfere with the rifle's operation. The AR grip can now be installed back onto the chassis block. Adjusting the buttstock length of the pull, cheek comb height or any other adjustments might be necessary.
Installing an XLR Push Button Folding Adapter is a great way to enhance the functionality of your rifle, turning it into a more compact package that's easier to transport and store. Always remember to handle firearms safely and comply with all legal regulations.


